Monday, December 21, 2009

Peace, love and tie-dye, plus dinosaur long johns

I've been playing with the dye pot and fabric paints again, oh no! Sometimes the results are good; sometimes not so much.

This tee shirt turned out pretty well.  I used the low-water immersion method of dyeing, where you put the piece in a plastic bag with a small amount of water, dye and fixative.  I poured two colors in there:  turquoise and yellow.  The result was a kind of green:

After I dyed it, I used fabric paint to stamp some stars on it.  Stamping results in a kind of transparent, not very visible mark.  So I also used some stenciling around the neckline, which results in a more opaque mark for some reason.  Maybe because you end up putting down more paint.


Here is a detail:


On the back I drew some spirals free hand, squeezing the fabric paint out of a little applicator bottle. It was fun.  Makes you wonder why you don't draw on your clothes all the time.


Also I dyed some capri pants I got from Walmart last summer.  The colors are cerulean blue and turquoise.  Then I stenciled some shapes on the legs.  These were not so successful I think:  the design is too rigid or something.


The yellow moons, which you can barely see, were stamped on.

Then I made a little hooded fleece top for my niece, using an Ottobre magazine pattern:


The fleece came from Hancock's, and it was pretty good quality for Hancock's.  However, if I had had time, I probably would have ordered the really good stuff online. The best fleece, IMHO, is Polartec from Malden Mills. There's an outlet online where you can get it cheap.

This pattern had a really cute feature:  the reverse applique on the front pocket, and then here on the back too:


My new sewing machine came in useful for this:  you use triple reinforcing stitch to stitch around the petal shapes, through the fleece layer and the contrasting layer piece underneath.  This was tricky at first, but I got better at it. Then you cut away inside the shapes to reveal the other color underneath.  (You use a piece of tear-away stabilizer under all layers.)

From a different Ottobre magazine, I made some boys' long johns, using the beloved dinosaur skull knit fabric I got last summer:

The idea here was that the seams would be on the outside for comfort, and then would be covered by this rib knit.  It worked, but then that left a big wad of several layers
of fabric at the crotch seam.  But I fixed that by zigzagging
it down.

Monday, December 14, 2009

Monster fulled yoga socks for December


The December Sock-down challenge on the Ravelry group Sock Knitters Anonymous is to make a sock that's not quite a sock.  One of the options is a pair of yoga socks.  This is what they look like.  (Note:  this is not a picture of my feet and my socks; this is from a Ravelry page with a yoga sock pattern on it.  I just put it here to show you what a yoga sock is.)

The idea is that your heel and toes can still grip the mat, but your feet don't get as cold as they would barefoot.

The other part of the challenge is to use up as many bits and pieces of yarns in your stash as possible.  Socks with a lot of very different (sometimes clashing) colors are sometimes called Monster Socks on Ravelry. I have a big stash of sport weight yarns in many colors:


Most of these balls are handspun yarn, although there are a few mill spun balls in there.

One problem with making socks from handspun is that my handspun wool does not have any nylon mixed into it. Nylon makes the socks wear longer without getting holes.  In the past, I have tried to card nylon with wool to make a sock blend, but it didn't blend in very well and I didn't like the result.  So my new idea, to make the socks more durable, is to full them before wearing.

Fulling is just washing the socks in hot water and perhaps tossing them in the dryer, to make the wool fibers catch on and cling to each other more tightly, otherwise known as shrinking.  It is like felting, in that the objective is to make the wool fibers fuse together, but felting is done with loose unspun fibers, whereas fulling is done to woven or knitted fabric.  It was common to full woven fabric in pre-industrial times; in Scotland, there were "waulking" parties, where wet wool was beaten over and over by gangs of women around a table, as they sang songs called "waulking songs."  Nowadays, all we have to do is throw a piece of woven or knitted wool in the washer with some hot water and some other pieces of clothing, agitate in the machine, and then remove and check the degree of fulling.  Further fulling can be done in the dryer, as the semi-wet piece tosses around in the humid heat.

Fulling makes knitting much more durable, so it seems a natural for socks.

I plan to knit fair isle yoga socks with corrugated rib at the top and along the edge of the opening at the heel and toe.  After fulling, I'll have an idea of the gauge of my fulled knitting--the number of stitches per inch after fulling, as well as before fulling--which will be useful information in designing future fulled socks or other clothing.  Ideally, I could come up with a percentage rule--i.e.  "make your sock 10% wider and 15% longer than you intend for it to be after fulling"--that would work for most wools.

Sunday, November 29, 2009

Anatomical toes

I've been experimenting with anatomical toes on socks.  Most people's feet are not pointed like a normal homemade sock's toe is.  Well, maybe a normal sock is not pointed, but it has a rounded point.  The "normal" sock toe decrease is that you decrease the number of stitches on both sides, right and left, at the same rate, four stitches every other round.

But on my foot, the outside of the foot curves in more at the toe than the inside, because my big toe points pretty much straight ahead. I have never worn really pointy shoes in my life, so my feet have not taken on the shape of pointy toed shoes.  My feet are shaped like the Birkenstock clogs I wear almost all the time.

So I have started making sock toes reflect this fact.  My first effort was this:


I did no decreases at all on the big toe side, just on the outside "little toe" side.  It's very comfortable.

On my second model, I decreased every other row on the outside of the foot for about 3/4 inch, and then I started decreasing on both the inside and the outside of the foot, four stitches eliminated every other row, for another 1 1/4 inch approximately.  This yielded the following toe:


It's pretty comfortable too, but I think the first one is more comfortable.  We'll see which is better after I've test-driven both for a few weeks.

Saturday, November 21, 2009

Miss Marple Mystery Sock

I have become addicted to Sock Knitters Anonymous, a group on Ravelry.  SKA has a monthly "challenge, " beginning in September:  each monthly challenge gives the knitter a choice between knitting a sock by a certain designer; or a sock using a certain technique; or, every other month, the mystery sock.
For November, the technique is mosaic knitting, and the mystery sock was designed by Star Athena.  That is the challenge I'm working on this month.


I learned about mosaic knitting early in my knitting career, which began thirty years ago.  My first knitting teacher was Barbara Walker, who wrote a book called Learn-to-Knit Afghan Book.  This is the first knitting book I ever had.  Barbara Walker is a big exponent of mosaic knitting.  It uses two colors (or more) like Fair Isle knitting, but you don't carry two colors in one row as in Fair Isle knitting; the color work results from slipping stitches from the previous row.  You knit two rows of one color, then two rows of another color, but you are slipping stitches from the row below, so it looks as if there are two colors carried in one row, sort of.

For some reason I didn't really take to mosaic knitting thirty years ago.  I didn't really like the way it looked as well as I liked the way Fair Isle knitting looked.  Mosaic knitting has a kind of angular look to it, whereas Fair Isle patterns are more organic-looking, and with Fair Isle knitting, you can knit dancing ladies or dogs or skateboarders (yes, I graphed a skateboarder once for my son's hat).

But I love Star Athena's design for this sock.  It's intricate and absorbing to knit. I'm still working on Clue # 2 (a new clue is published on Ravelry and Star Athena's blog every Sunday of November), so I'm a little behind.   The cuff had one mosaic pattern (clue #1) and the leg has two mosaic patterns that alternate, although you can only see one in this picture. When I'm further along, I'll post another picture.

Sunday, November 1, 2009

Woodsman's Socks

I have recently become aficianada of Ravelry, a great online community for knitters, spinners, and crocheters.  On Ravelry, you can join various groups:  I joined the Spinner Central group, Adult Surpise Jacket group, and a huge group, Sock Knitters Anonymous.  Sock Knitters Anonymous has over 8000 members!

One of its main activities and attractions is Sockdown: Ravelry!  Sockdown is a series of monthly personal sock-knitting challenges, not really a contest, although there are prizes.  (I'm not sure how they decide who gets the prizes, but no matter.)  Every month you have a choice of usually two or three challenges, and you can do one or all.  One challenge is always a technique or style of sock; for example, in October it was making a man's sock, and in November it was using mosaic knitting in a sock.  Or, a certain designer is featured, and you can make any design by that designer.  On odd-numbered months, like November, there is a Mystery Sock!  A well-known designer designs a sock for that month, and the first "clue" is posted on the first of the month.  The mystery sock for November is called Miss Marple, after the Agatha Christie character, and the technique is mosaic knitting. All we know now about the Mystery Sock is how to knit the cuff; future details will be forthcoming.

You have two months to knit your sock.  That's lucky for me, because I didn't cast on my man sock for October until October 30!  I chose an easy, fast, and reliable pattern:  Elizabeth Zimmerman's Woodsman's Sock, from Wool Gathering 10. I made this about twenty years ago for my dad, and he loved it, but unfortunately it was made out of 100% real wool, and it shrank in the washing and drying.  So this time I'm making it out of a washable wool blend with some washable merino and nylon:  Stroll Sport, sold by KnitPicks.


The original EZ pattern called for a heavy Bartlettyarns yarn, but I am using two strands of Stroll Sport to equal the weight of the original yarn.  I couldn't find a bulky washable sock yarn.  Maybe somebody should make one.  Heavy socks are great under boots in the winter time.

To make this sock you cast on 44 sts on size 6 needles.  I will knit the ribbing for about seven inches, and then continue the ribbing on the top of the foot.  This makes a sock that hugs the foot snugly.  The pattern can be found in EZ's books Knitting Around and The Opinionated Knitter. 

Sunday, October 11, 2009

Finishing the Adult Surprise Jacket


Today I sewed up the adult surprise jacket and darned in all the loose ends. Then I could try it on.

It fits pretty well. I am glad that I did the armhole depth adjustment. This is a slight change to the pattern that is recommended if you want a deeper armhole than on the original pattern. I don't like tight armholes, so I did this adjustment. It causes the top seam to move a bit toward the back, but this isn't a problem for me.

The only slight fit problem is that it is not quite as big around as I planned it to be. The directions said to find out your gauge, and then measure a sweater that fits well to figure out how many stitches to cast on. My error was that I thought my gauge was 4 sts/in, when in fact it was closer to 4.5 sts/in. Still, it fits like a slim cardigan rather than a boxy jacket, and that's ok.

The other mistake that I made was to use some chenille here and there, and it is already worming its way out in places, like on the sleeve, as you can see in the picture.


I sewed up the sleeves. There was an option to join the sleeves to the back at the top of the sweater by doing an I-cord cast-off, but that would have created a little raised cord along the back of the arm and shoulder, and I thought that might not be comfortable under a jacket. Just plain old sewing with a darning needle worked fine.

I still don't have any buttons, but that will soon be remedied.


So, would I make this sweater again? I might make it again as a tee shirt. If you didn't lengthen the sleeves or the bottom, and just made it exactly like the baby surprise jacket with elbow-length sleeves, it would be a nice short jacket. Or you could seam it up the front and make a pullover tee.

I think it's a good pattern for cotton yarn. Knitting cotton in garter stitch gives it some stretchiness that plain stockinette stitch, knit in cotton, lacks. Garter stitch is very stretchy in all directions, so the fact that it's a bit tight around the bottom of the sweater is not a huge problem.

Cotton is not my favorite knitting yarn, although it's practical for Houston. One problem I noticed when I was darning in the ends is that they don't stay darned in, as wool ends do. They are slippery and easily work themselves out. So I had to tie some knots on the inside to keep the ends stable.

The one bad thing about knitting sweaters in one large, amorphous shape like this is that you can't try it on near the beginning to make sure you've got it the right size. When you knit in the round from the bottom up, you can do this.


My next sweater is going to be a wool fair isle sweater knit from handspun, so I will be able to try it on near the beginning and make sure it's right before I proceed.

I think I will get a lot of wear out of this sweater, though, as it's the perfect weight for Houston in the fall. And because it has almost every color in it, it matches all my clothes!

Friday, September 25, 2009

Adult Surprise Jacket, almost done


I've been knitting a classic Elizabeth Zimmerman pattern called the adult surprise jacket for the last few months. I made a baby surprise jacket (known on the internet as BSJ) years ago for my nephew, but I had sort of forgotten how strange and ingenious the design is. EZ somehow figured out how to make a jacket in one piece out of garter stitch. The shaping relies on strategically placed decreases and increases. You start knitting at the top back, and your decreases cause the ends to turn until they form a ninety degree angle with the back, at which point they begin to resemble sleeves. You just have to follow the directions and have faith.

EZ describes the way she "unvented" the first baby surprise jacket: she was just sort of mindlessly knitting along on a square of garter stitch, making some decreases. At one point in frustration she threw her piece of knitting against the wall. It fell on the floor and miraculously, it folded itself in such a way as to suggest said sleeves. "Aha!" she thought, "A baby jacket!" The original baby jacket pattern, first knitted for EZ's grandson Cully, was printed in her newsletter in 1968. It has become a very popular, even classic, pattern, and there are groups on the internet devoted to discussing the knitting of it.

The thing that's so cool about this pattern is the way it uses up odd bits of yarn while you knit the stripes, in a totally spontaneous process that results in something very planned-looking. The symmetry happens on its own because of the fact that it's knit in one big piece. But it looks as if you labored mightily to make the sleeves and fronts symmetrically striped. Also, the way the decreases and increases miraculously turn and shape the garment is fascinating. EZ was a genius. (Well, everybody knows that.)

The new BSJ pattern from Schoolhouse Press includes an adult version (the one I'm knitting) and a child version. For the adult and child versions, you lengthen the elbow-length sleeves by knitting up from the bottom of the cast-on edge of the sleeves.

I'm at the part where you knit up the button band around the front. (The button band also travels around the back bottom edge of the jacket.) You make an ingenious one-row buttonhole by casting off four stitches, and then making four backward loops on your needle. When you come back on the next row, you knit up those four loops, and there's your button hole.


I am using some cotton yarn in a worsted weight that I've had for almost fifteen years in my stash. I bought it from Webs years ago, back when they sent out yarn samples once a month. I was going to use this thick yarn as weft for placemats, but I never made the placemats.

When we were on our road trip this summer, we went to Northampton, MA. Webs is there! It turned out to be within a few blocks of my son's apartment. So one day I walked down there with the old yarn to try to match it and get a little extra. They didn't have that exact yarn, but they had something nicer that was very close in weight and color. It was fun to actually see the gigantic Webs warehouse of yarn, which had acquired a sort of mythical stature for me over the years when I was a professional weaver.

Saturday, September 5, 2009

Sewing Orgy: Pieced tee shirt

Sometimes right before I go back to Houston to work, I indulge in a two or three day sewing orgy. This is not something that I plan; it just happens. I make a whole lot of clothes in a few days.

Yesterday I finished a vest; today I made a tee shirt. I had a lot of scraps of knits left over from other tee shirt projects. Some of these tees that I made last year didn't work out too well: they were too tight under the arms mainly. (It was a surplice tee pattern, and those are more fitted so that your boobs won't jump out.) The fabric was cotton knit that I had bought plain white from Dharma Trading and dyed. Also I did some bleach discharge and fabric paint stamping on it.

To make the shirt, I used a Kwik Sew tee shirt pattern from a Kwik Sew book. It's called Easy Sewing the Kwik Sew Way, and it's the first edition, not the second. The tees in the first edition are the boxy, eighties style tees that I like because they are so comfortable.

I altered the pattern a bit by narrowing the shoulders and shortening the sleeves, as I always do for every pattern.

Then I used a technique I had learned from making a Marcy Tilton pattern. In one of her tee shirt patterns, the front is pieced from two pieces of knit fabric zigzagged together in a sort of curve down the front of the shirt. The same is true of the back. You just overlap the pieces and zigzag the overlap, leaving a raw edge. It looks great and it doesn't ravel. Hurray for knits!

I had a lot of small pieces of fabric, none big enough to cut half of one side of the front or back, so I pieced smaller pieces together until I had a piece big enough to cut out one side of the front. I cut it so that there was about three inches extra of fabric added in the center of the shirt. Then I did the same to make the other side of the front. Then I overlapped the two pieces, drew a curvy line down the center, and zigzagged that line. Then I cut away the extra fabric outside the lines. I may not be explaining that very well, but here's a picture:


You can sort of see the chalk line where I marked the center front, in order to line it up with the other center front. You can also see that I left some fabric outside that center front line, to overlap the other piece.

HEre's the back:


The tee shirt is as comfortable as I had hoped it would be.

Those surplice tees that I took apart to make this tee were flattering, but not comfortable, and I was always worried that when I leaned over, a boob would hop out or be visible. Not good at work.

I think this piecing technique would work for my favorite tank top pattern too. I still have a lot of knit scraps yet, but I'm not sure I have time to make any more clothes before I leave tomorrow.

Marcy Tilton vest, Vogue 8399


I just finished making what for me was a pretty hard pattern, Vogue 8399, designed by Marcy Tilton. I've made a lot of Marcy Tilton designs in the last year or so. Mostly, I really like them. I wore them almost exclusively last fall and spring to work.

This pattern, though, was frustrating and difficult. I was making the vest version, from a cotton linen blend I got very inexpensively at Hancock's. This version was sort of my muslin.

The first thing that was hard was that you were supposed to take some silk organza and pleat it so that you created a kind of new piece of fabric from which you cut out that back piece that you see in the picture above. I didn't have any organza so I used some very fine, transparent silk. The folding and pleating was difficult because the silk was so slippery. Also, by the time I finished doing all the folding, pleating and stitching down of pleats, the piece was almost too small to cut out the godet!

Also, you were supposed to bind the back seam with home-made bias tape, a Hong Kong finish. This looked good, but when you sewed in the godet, it covers up the beautiful Hong Kong finish! This didn't make sense to me. I would rather have sewed the godet to the back seams and then added the seam binding, to cover the messy edge of the godet. But, instead I just turned under the edges of the godet and tacked them down.

The next major frustration was the fact that the shoulder seams were drafted incorrectly! I first got an inkling of this when I read a review of the pattern on Sewing.patternreview.com. There was only one review, but this reviewer noticed that the shoulder seam is drafted so that the "flanges"--the darts on the outside of the vest--are drafted as if they were to be folded toward the shoulder rather than toward the armhole. You are directed to fold them toward the armhole. I found out that she was right. It's hard to describe this problem without showing you a before and after shot, but suffice it to say, I had to unpick the shoulder seam and dart, redraw the shoulder seam , recut the shoulder seam, and resew the shoulder seam so that the flange wouldn't stick up in the air at the shoulders. That looked ridiculous when I did it the way the pattern was drafted.

I am ambivalent about the flanges generally. I may eliminate them if I make this pattern again.

I liked the way the neckline rises up to cover the back of your neck. It was a little difficult to sew the back to the front extensions which became this neckline, but it was worth it.


I liked the way the front was designed. You see two different contrasting fabrics in front, one where the facing shows a bit around the neck, and one where the front bands contrast with the front fabric.


The neckline feels good, like the way my fleece jacket has that high collar around the back of my neck.

Also the pockets are fine.

I wish I had used a slightly heavier fabric. This one feels a little too light, not quite stiff enough. The pattern has a vaguely Asian feel to it. Maybe an ikat cotton would be a good choice for the next iteration. Or a handwoven cotton-linen fabric.

Wednesday, September 2, 2009

Ottilia dress


I finished the Ottilia dress today from Ottobre Winter 2007. I think it's pretty cute.

Sunday, August 30, 2009

Ottobre magazine; invisible zippers; 1904 Singer

I have one Ottobre magazine, from Winter 2007, that I've been sewing from for a year or so.  It has so many great patterns in it that I haven't bothered to get a newer one.  Ottobre  magazine is like Burda World of Fashion, with many styles in it.  You trace the patterns from a big pattern sheet that's stapled into the center fold of the magazine.  My Ottobre magazine only has kids' clothes, but they publish two a year with women's clothes.  It is published in Finland, but there are editions in English and other languages.

I am making this dress for my niece:

 
The pattern called for printed velveteen fabric.  I couldn't find any at my local fabric stores, but apparently there are European manufacturers of printed velveteen, notably a company called Hilco.  A few online fabric stores sell Hilco fabric, but it was pretty expensive, and they didn't have the exact colors I wanted, so I got some fine-whale corduroy at Hancock's locally.  It's soft and cozy like velveteen so I thought it would work.
The magazine also has some clothes for boys.  One outfit is called "Oliver," because it's supposed to look like Oliver Twist's clothes.  Presumably this is what Oliver wore after he was rescued from his life of pickpocketing and living in an orphanage.  If he'd been dressed like this in the orphanage, he wouldn't have needed to beg for more gruel; he could have sold his fancy linen shirt and bought cupcakes at Whole Foods.

You can make a little boy  wear anything. I confess to making flowery Liberty print shirts for Will when he was too little to understand the indignity of it.  But what big boy would wear drop-front trousers like these?  Ok, maybe if you make them "Goth," like Ottobre did for the big boy version, by sewing them up in black denim, some rockabilly wannabe Man in Black might wear them, but I think it would be wise to get his approval ahead of time before putting too many hours into this outfit.


I did actually see a guy in his twenties wearing pants like this at an English Country Dance ball once.  It was an effort to achieve the Mr. Darcy look.  It almost succeeded.  But you can't help wondering:  doesn't it take a long time to undo all those buttons when you  have to go?

Enough of pattern reviews, and on to the sewing.  I am making the dress in pink corduroy as mentioned above.  It has adorable rick rack and ruffle details.  For example, at the bottom of the sleeve, you baste on the big rick rack, and then attach the ruffle. When you fold up the seam, the rick rack overlaps the ruffle!  How cute!

 
Also the pattern involves an invisible zipper.  I tried to put one in last Christmas, in a skirt, and failed miserably, because I didn't have an invisible zipper foot. It turns out that this is pretty essential.  So this time I bought a plastic invisible zipper foot at Hancock's that had adapters that supposedly made it fit onto any machine.  Well, it didn't fit on my Bernina. But...it did fit on my 1904 treadle-powered Singer!  I knew I had kept that machine for a reason!
I used that machine for the first time in years today.  It's older than my oldest camera.  I got it when I lived in Chattanooga in the late seventies, at an auction.  An ancient Singer repairman was able to put a new bobbin case in it.  He just reached into a drawer labelled "1904" and pulled out the right part! How amazing!  It has run like a top ever since.  I got it because back in those days we were worried about energy prices and running out of oil and silly things like that.
Here it is all outfitted with a brand-new plastic invisible zipper foot.  Nothing else on this machine is remotely plastic:
  

Winding the bobbin on this machine is aerobic exercise.

I did insert the zipper and it is invisible.  Pretty much.

 
However you may have noticed the little issue with the two yoke backs not lining up.  Oh well.
The problem is, I was planning to write about how European patterns like the Ottobre patterns and Burda patterns are better because they don't have seam allowances.    I like this system, and I read that this is how couture is done:  you draw around the pattern pieces (I draw little dots) and this is your seam marking. Then you cut one centimeter or more away from that when you cut the fabric.

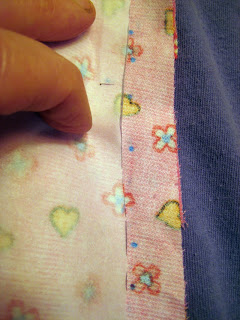
Theoretically, this should make for more accurate marking and sewing than the method of that horrible wheel and tracing paper system that American pattern manufacturers want you to use.  And usually, it does make my sewing more accurate to do it the European/couture way.  But for some reason it didn't work this time, on that yoke piece.  I guess I marked incorrectly somehow. It could have something to do with the fact that my disappearing ink disappeared overnight instead of in the wash like it's supposed to.  (I  re-did it for this picture on a different piece.)  Maybe it's too old, or the air is so humid that it somehow evaporated it.
Anyway, the next step in the dress making process is to attach the rick rack to the neck and the hem, and to attach the bottom ruffle on the hem. Then there's an underdress with a contrasting ruffle.
I wish there were grownup patterns this ruffly and girly.  I was thinking that the structure of this dress is not that different from the Folkwear Afghani Nomad dress, which I've made before.  Maybe I could make it again, but with extra ruffles and rick rack.

Thursday, August 27, 2009

Dinosaur shirt

When I went fishing with my nephews and my dad last week, I was wearing my coolest pants:  a Marcy Tilton pattern that I  made with a knit I found at Hancock's, a "juvenile" print that was just too wonderful to be off-limits to adults.  It was in my colors--various shades of indigo blues--and it had dinosaur skulls and the word "Dinosaur" (in case you didn't know) all over it.

My nephew Jack, who is a naturalist, of course noticed the pants and said, "Did you know your pants have dinosaurs on them?"  He said he would like to have a shirt made out of the same fabric, and some pants too.

Hancock's was out of the fabric, but I found it quickly online, at an Etsy shop and also on Ebay.  How wonderful the internet is!  I ordered the fabric and the one yard from the Etsy shop came in two days.  The other packet, of 1 5/8 yards, accidentally went to Houston because I had not changed my address at Ebay or paypal or something.

So today I made up the shirt, using an old pattern from a Kwik Sew book of children's clothes.  It was very easy to cut out and sew.  I think the whole thing took a little over an hour.

I really like Kwik Sew patterns.  They don't have too many bells and whistles, particularly the patterns in their books.  Also, they keep most of their older patterns in print.  I've noticed a trend toward more fitted, tighter clothes in all the pattern companies, but Kwik Sew keeps their old, loose-fitting, eighties-style patterns in their book, the ones with the dropped shoulders and no darts.

Of course, kids' clothes pretty much stay that way, regardless of fashion trends.

As for the pants, I'll have to make those at Christmas, since I don't have the fabric here, and I'm going back to Houston soon.  I wonder if Marcy Tilton designs clothes for children?